Traversing the DOM
A Comprehensive Guide for Javascript Developers

Hi there, I am a Software Engineer passionate about exploring web technologies, building solutions and sharing knowledge.
Introduction
One feature that sets Javascript apart from other scripting languages is its ability to select and manipulate HTML on a page through the DOM(Document Object Model). Even though the DOM was designed to be independent of any particular programming language, Javascript has fully gained preference as the language of the web. We can easily inject dynamic content into our web pages and create amazing effects with the power of the DOM.
In this article, we take a deep dive into some valuable methods exposed by the DOM API(Application Programming Interface) for selecting elements on a web page. This helps us to easily navigate our way through a webpage and get things done.
NB: If you are not sure what an API is, check out this well-explained article.
Prerequisites
This article was written with beginners in mind, only a basic knowledge of Javascript is required to follow through.
A Refresher on the DOM
The Document Object Model offers a means of representing the content of a web page in a hierarchical way that makes it easy for programs to alter the styles, structure, and content. It's best to visualize the DOM in a tree-like form. Trees have stems, many branches, and uncountable leaves attached.
In the same way, a webpage usually comprises many elements nested and branched to one another. A simple illustration, say we have an HTML page:
<html>
    <head>
        <title>My title</title>
    </head>
    <body>
        <a href="#">My Link</a>
        <h1>My Header</h1>
    </body>
</html>
The DOM structure would look like this:
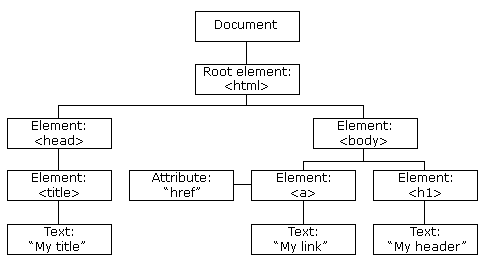
Image courtesy - w3schools
Traversing the DOM
Traversing, according to the Merriam-Webster Dictionary, means "to move back and forth or from side to side". And that is exactly what we seek to learn in this article. How do we move through the DOM tree and select the desired element(s) we need? Let's get right into it.
We can traverse the DOM in three directions:
Downwards
Sideways
Upwards
Traversing Downwards
Traversing the DOM downwards often involves selecting descendants elements from a particular reference point. There are two major ways to traverse downwards which are:
element.querySelectororelement.querySelectorAllelement.children
Let's see them in action.
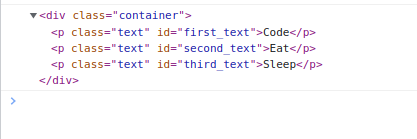
<div class="container">
    <p class="text" id="first_text">Code</p>
    <p class="text" id="second_text">Eat</p>
    <p class="text" id="third_text">Sleep</p>
</div>
We have a container and some texts with unique ids but sharing the same class. Let's access some elements to illustrate downward traversing.
element.querySelector()
const container = document.querySelector(".container")
console.log(container)
//returns <div class="container">...</div>
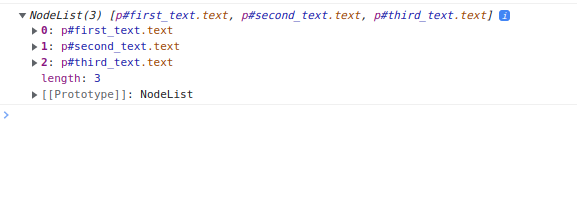
element.querySelectorAll()
const texts = document.querySelectorAll(".text");
console.log(texts);
//returns a NodeList of all elements with class "text"
element.children
const container = document.querySelector(".container");
console.log(container.children);
//returns a HTMLCollection of all children of the container element.

N.B: To understand the difference between NodeList and HTMLCollection, kindly check out this article.
Traversing Upwards
As you guessed, traversing the DOM upwards involves selecting the parent elements from a particular reference point in the DOM. There are two methods to traverse upwards:
parentElementclosest
Let's see illustrate them with examples.
element.parentElement
const first_text = document.querySelector("#first_text")
console.log(first_text.parentElement);
//returns the parentElement which is the container

element.closest()
element.closest gives us more control of upwards traversing. While element.parentElement selects only the immediate parent, we can go upwards multiple levels with the closest method.
It traverses the element and its parents (heading toward the document root) until it finds a node that matches the specified CSS selector. - mdn web docs
const first_text = document.querySelector("#first_text")
const closestContainer =  first_text.closest(".container")
console.log(closestContainer)
//returns <div class="container">...</div>
In this example, the search begins from first_text and continues upwards until a parent element with class 'container' is found and returned.
Traversing Sideways
Traversing the DOM sideways involves selecting elements using their relationship with a reference element on the same level of the DOM. Easily referred to as Sibling elements. There are three methods to traverse sideways:
nextElementSiblingpreviousElementSibling
nextElementSibling
As the name suggests, this method helps us to access the next sibling element of a specified element. Let's get back to our use case.
const first_text = document.querySelector("#first_text")
console.log(first_text.nextElementSibling)
//returns the next element <div id="second_text ">...</div>

previousElementSibling
This does the exact opposite of the previous method, helping us select the previous sibling of a specified element.
const second_text = document.querySelector("#second_text")
console.log(first_text.nextElementSibling)
//returns the next element <div id="first_text ">...</div>

Recap:
Traversing downwards
element.querySelectorelement.querySelectorAllelement.children
Traversing upwards
element.parentElementelement.closest
Traversing sideways
element.nextElementSiblingelement.previousElementSibling
Conclusion
Practice makes perfect. Putting these methods to use in a Javascript project will help solidify what you have learned so far in this article. I encourage you to get your hands dirty writing code. Thanks for reading, cheers.
If you would like to reach me with comments, questions, or suggestions. Kindly drop a comment in the section below or send me a message on Twitter


